
매달, 우리는 1000명 이상의 사람들이 시험 준비를 잘하고 시험을 잘 통과할 수 있도록 도와줍니다.
Configuring and Operating Windows Virtual Desktop on Microsoft Azure 온라인 연습
최종 업데이트 시간: 2025년10월11일
당신은 온라인 연습 문제를 통해 Microsoft AZ-140 시험지식에 대해 자신이 어떻게 알고 있는지 파악한 후 시험 참가 신청 여부를 결정할 수 있다.
시험을 100% 합격하고 시험 준비 시간을 35% 절약하기를 바라며 AZ-140 덤프 (최신 실제 시험 문제)를 사용 선택하여 현재 최신 53개의 시험 문제와 답을 포함하십시오.
정답:
Explanation:
Reference:
https://docs.microsoft.com/en-us/powershell/module/az.desktopvirtualization/?view=azps-6.6.0#desktopvirtualization
https://techgenix.com/logging-off-and-removing-wvd-user-sessions/
정답:
Explanation:
Reference: https://docs.microsoft.com/en-us/azure/virtual-desktop/azure-monitor
정답:
Explanation:
Azure Advisor is a personalized cloud consultant that helps you follow best practices to optimize your Azure deployments. When it recommends enabling a validation environment for Azure Virtual Desktop (AVD), it's referring to setting up an environment where you can test out new features, updates, or changes before rolling them out to your production environment.
The option that best matches the description of ensuring business continuity through AVD service deployments by enabling a validation environment would be:
C. Preview features for Azure Virtual Desktop
This is because a validation environment is commonly used to assess new features or updates in a non-production environment to ensure that they do not disrupt the service when implemented in production. This helps maintain business continuity by preventing untested changes from affecting end-users. It's not specifically for testing capacity, security settings, or Azure Site Recovery failover, although those could also benefit indirectly from having a validation environment.
정답:
Explanation:
Reference: https://docs.microsoft.com/en-us/azure/virtual-desktop/disaster-recovery
정답:
Explanation:
Reference: https://docs.microsoft.com/en-us/azure/virtual-desktop/drain-mode
정답:
Explanation:
Reference: https://docs.microsoft.com/en-us/azure/virtual-desktop/drain-mode
정답:
Explanation:
Reference: https://docs.microsoft.com/en-us/azure/virtual-desktop/drain-mode
정답:
Explanation:
Ensuring that an Azure Virtual Desktop (AVD) host pool can fail over to another region is a multi-step process. The first step in creating a disaster recovery plan for AVD involves setting up infrastructure in the secondary region that can support the AVD deployment when the primary region is not available. This typically includes creating a new host pool in the secondary region.
Here's why creating a new host pool is the first step:
A. Create a Recovery Services vault: While a Recovery Services vault is used for backing up virtual machines, it's not the first step for AVD failover because AVD uses host pools, not individual VM backups, to manage desktops and apps.
B. Create a virtual machine snapshot of each session host: This would capture the state of each VM but does not address the AVD-specific configuration or the regional aspect of failover.
C. Create an Azure Storage account that uses geo-redundant storage (GRS): While having GRS is important for data resiliency, it does not directly enable the AVD deployment to failover. GRS ensures that the data is replicated in a secondary region, but it does not provision the necessary AVD infrastructure in that region.
D. Create a new host pool: This is the first step toward establishing a failover capability because it sets up the necessary AVD infrastructure in the secondary region. Once the new host pool is created in the US West region, you can configure it with the appropriate images, session hosts, and network settings to match the primary deployment. Afterward, you can use Azure Site Recovery or manual processes to handle the replication of user profile data and other necessary components.
Therefore, the correct action to take first is:
D. Create a new host pool in the US West Azure region.
정답:
Explanation:
Reference:
https://docs.microsoft.com/en-us/azure/automation/automation-solution-vm-management
https://docs.microsoft.com/en-us/azure/automation/automation-solution-vm-management-enable
정답:
Explanation:
To sign out users from the session hosts in an Azure Virtual Desktop environment, you would use the cmdlet that is designed to log off user sessions from the session hosts.
The cmdlet that fits this description is:
A. Invoke-RdsUserSessionLogoff
This cmdlet allows you to log off a user session on a session host in a specific host pool. It is part of the PowerShell module for Azure Virtual Desktop (formerly known as Remote Desktop Services - Rds).
Please note that PowerShell cmdlets can change over time, and it's important to use the most current version of the Azure Virtual Desktop PowerShell module.
정답:
Explanation:
You need to configure a Configuration Profile in Intune or use Group Policy.
정답:
Explanation:
Reference: https://docs.microsoft.com/en-us/mem/intune/fundamentals/azure-virtual-desktop
정답:
Explanation:
Reference: https://www.compete366.com/blog-posts/eight-tips-on-how-to-manage-azure-virtual-desktop-avd/
정답: 
Explanation:
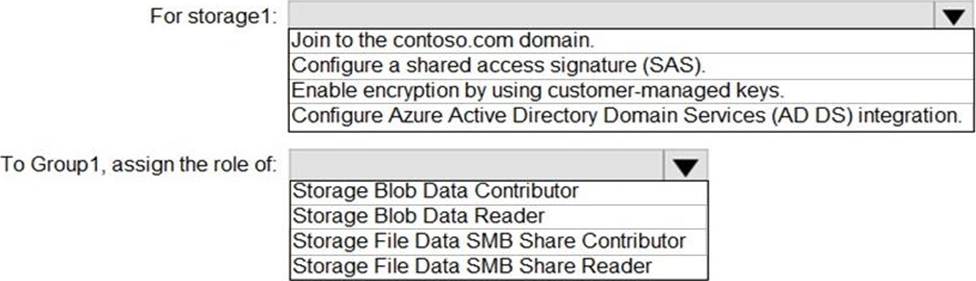
Configure Azure Active Directory Domain Services (AD DS) integration./To use FSLogix profile containers in an Azure Storage account to store user profiles, you need to configure the storage account for Azure Active Directory Domain Services (AD DS) authentication. FSLogix uses SMB shares, which require proper permissions for the users to read, write, and create profiles within the file share.
Here's what should be included in the solution:
For storage1:
Join to the contoso.com domain: This is not applicable for Azure Storage as Azure Storage accounts do not join traditional Active Directory domains.
Configure a shared access signature (SAS): This is typically used for granting limited access to objects in your storage account to other clients, without exposing your account key. This is not typically used for FSLogix profiles.
Enable encryption by using customer-managed keys: This is an optional security enhancement that allows you to manage your own encryption keys, but it is not specifically required for FSLogix.
Configure Azure Active Directory Domain Services (AD DS) integration: This is required for FSLogix because it allows you to use Azure AD credentials with SMB access, which FSLogix requires to connect to the file share.
To Group1, assign the role of:
Storage Blob Data Contributor: This role is for blob data in the storage account and is not relevant for FSLogix, which uses file shares.
Storage Blob Data Reader: Similar to the above, this role is for blob storage and not relevant for FSLogix file shares.
Storage File Data SMB Share Contributor: This role allows for reading, writing, and managing SMB file shares, which is what FSLogix requires.
Storage File Data SMB Share Reader: This role only allows for reading SMB file shares, which would not be sufficient for FSLogix profiles that need to write and manage data on the file share.
The correct answers based on the principle of least privilege are:
For storage1: Configure Azure Active Directory Domain Services (AD DS) integration.
To Group1, assign the role of: Storage File Data SMB Share Contributor.
Storage File Data SMB Share Contributor.
정답: 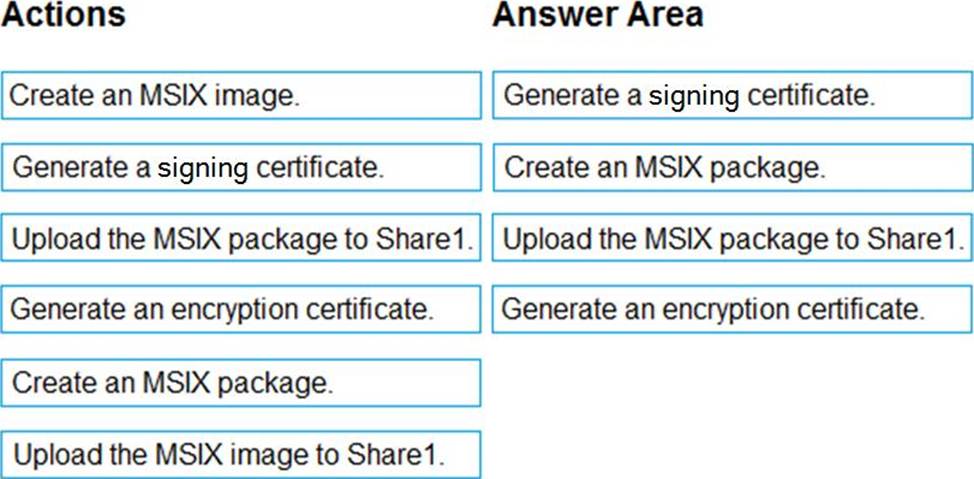
Explanation:
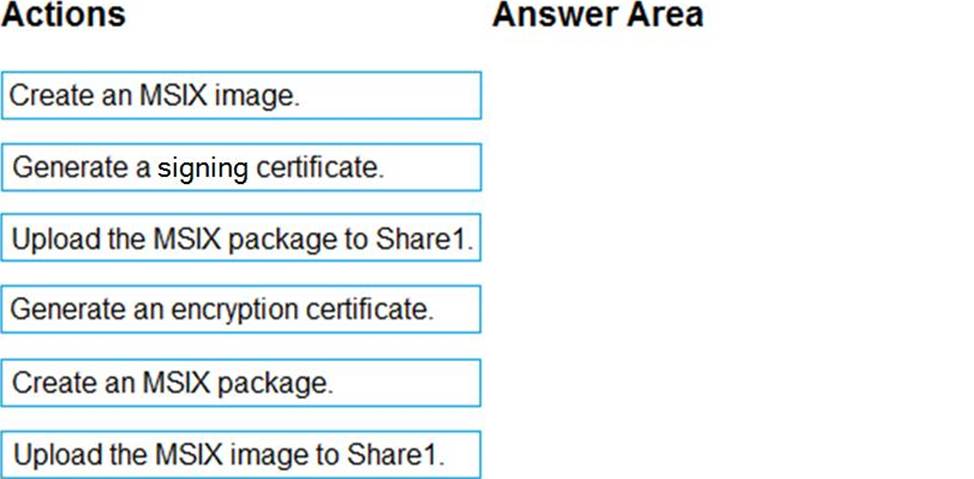
To publish an application to an Azure Virtual Desktop host pool using MSIX app attach, you need to create the MSIX package, ensure it's signed, and then upload it to a location accessible by the AVD session hosts. Here are the steps you would typically follow:
Generate a signing certificate: Before you can use an MSIX package, it must be signed with a certificate that the target machines trust. This certificate is used to sign the MSIX package.
Create an MSIX package: You package the application in the MSIX format. This process converts your application into a containerized package.
Upload the MSIX package to Share1: After creating the MSIX package, you upload it to the Azure file share (Share1). This location is where the AVD session hosts will access the package for MSIX app attach.
Generate an encryption certificate: If required by the environment for added security, generate an encryption certificate. However, encryption is optional and not a mandatory step for MSIX app attach.
Creating an MSIX image is not a step in the process of preparing an MSIX package for app attach. An MSIX image is typically used when you have a virtualized version of the OS, not an application.
Based on these options, the sequence of steps should be:
Generate a signing certificate.
Create an MSIX package.
Upload the MSIX package to Share1.
(Optional, based on the environment requirements) Generate an encryption certificate.
Since the "Generate an encryption certificate" step is optional and not typically a part of the standard process for MSIX app attach, it would be included as the last step if it is necessary for your specific environment. Otherwise, the first three steps are sufficient to prepare for publishing the app using MSIX app attach.